
Giving your kitchen A fresh And stylish new look can be easier than you think. With A few simple steps, You can makeover your kitchen cabinets And give them A completely new color. Whether you want to add A splash of bright color or go for something more neutral. This article will guide you through the process of how to change kitchen cabinet color. From prep work to choosing the right paint And sealant products, We’ll provide all the information you need to achieve beautiful results.
What Are Important Change In Kitchen Cabinet Color?
When it comes to kitchen cabinet color, There are A few important things to consider. First, You want to choose A color that will complement the other elements in your kitchen. For example, If you have white appliances, You may want to go with A neutral shade like beige or grey. On the other hand, If you have stainless steel appliances, Black or navy blue might be A good choice.
Think about the overall style of your kitchen. If you prefer A modern look, Bold colors like red or yellow can make A statement. Or for A more classic feel, Warm neutrals like browns and tans can provide balance.
Consider how much natural light your kitchen gets throughout the day. If it’s bright And sunny most of the time, Lighter shades can help reflect light And keep the space feeling open and airy.
The Benefits Of Changing Kitchen Cabinet Color
Change the color of your kitchen cabinet can be A great way to give your kitchen a fresh.
There Are Several Benefits To Changing Cabinet Color, Including
1. Increased Home Value
By giving your kitchen A facelift with A new coat of paint, You can increase the value of your home. This is especially true if you choose A neutral color that will appeal to prospective buyers.
2. Improved Aesthetics
A fresh coat of paint on your cabinets can make them look brand new And gives your entire kitchen an updated feel. Choose colors that complement the other elements in your kitchen. Such as countertops And flooring, For an even more cohesive look.
3. Cost Savings
Painting or staining cabinets is much less expensive than replacing them altogether. So you can save money while still achieving dramatic results. Plus, You’ll have the satisfaction of knowing that you did it yourself!
What Materials Are Needed To Change Kitchen Cabinet Color?
Changing the color of kitchen cabinets is A great way to give your kitchen A facelift without having to buy all new cabinetry. To get started, You will need some basic materials.
You will need paint And primer that is specifically designed for use on cabinets. It’s important to choose high-quality paint with good coverage so that your cabinets look great after they paint. You’ll also need paintbrushes, rollers, And painter’s tape to help you apply the paint evenly.
Finally, You should consider purchasing A degreaser or cleaner for removing any grease or dirt from the surface of your cabinets before painting them. This ensures that the paint adheres properly And lasts longer. Once you have all these materials in hand, You’re ready to start transforming your kitchen!
How To Choose The Right Paint For Your Cabinets
Choosing the right paint for your cabinets is an important decision that can make or break the look of your room.
Here Are A Few Tips To Help You Make The Best Choice
1. Consider The Finish Of The Paint
Glossy finishes are easier to clean and more durable, While matte finishes provide A softer look. You should also consider whether you want A semi-gloss or satin finish, Which falls between glossy And matte in terms of durability and appearance.
2. Think About The Color
Choose A color that complements your existing décor And will fit into your overall design scheme. If you’re unsure about what color would work best. It’s always best to consult with an interior designer or paint specialist who can give you advice on what colors will work well together in your space.
3. Consider The Type Of Paint
When considering how to choose the right paint for your cabinets. There are several things to consider. First and foremost, You need to pick the type of paint that will work best with your particular cabinet material. Latex-based paints are commonly used on wood, While oil-based paints are better suited for surfaces like metal or glass. Additionally, You’ll need to decide between A glossy or matte finish. Glossy finishes provide A more modern look And can be easier to clean. However matte finishes can help reduce glare in bright spaces.
Another factor is the durability And longevity of the paint. Higher-quality paints typically last longer than lower-quality ones. It’s important to ensure that your chosen paint is able to stand up against frequent use And exposure to moisture or heat. As these elements can cause cracking or peeling over time when not properly protected.
4. Look For Paint That Is Durable
Durable paint can help protect the surface of your cabinets from wear and tear, Allowing them to last longer. It’s important to consider how often you use your cabinets when selecting A paint that will work best. Cabinets used frequently should be painted with high-quality durable paint in order to maintain their integrity over time.
It’s important to keep in mind what type of finish you desire when selecting durable cabinet paint. Depending on your personal preference, Options range from satin finishes which offer an elegant matte appearance all the way up to high gloss finishes for those looking for A more modern look. Once you’ve decided on the desired finish. Make sure it is rated for durability as not all paints are created equal in this area.
5. Choose A Paint With A Sheen That Works For You
One of the most important decisions you’ll need to make is choosing the right paint. Not only will it affect the look and feel of your space, But it will also impact how well it wears over time. To ensure that your cabinets stay looking great for years to come.
The first factor to consider when selecting paint is its sheen. There are six basic types flat, satin, semi-gloss, eggshell, gloss, And high-gloss. Each offers different levels of durability And reflective qualities. From no shine at all in the case of flat paints up to A very glossy finish with high-gloss paints – so you can pick what works best for your style and needs.
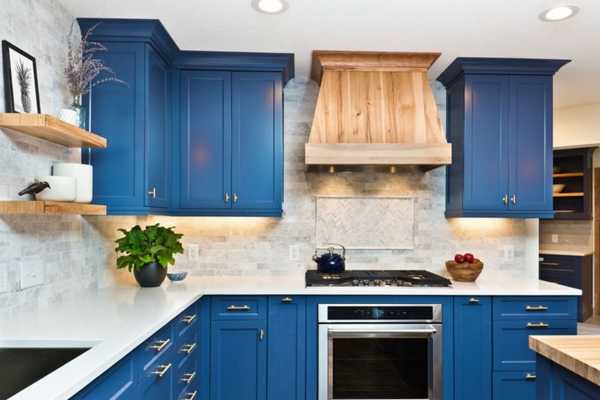
6. Consider The Color Of The Paint
Choosing the right paint color is one of the most important decisions you’ll make. It’s easy to be overwhelmed by the countless options available in today’s market. However, Finding the perfect hue doesn’t have to be a daunting task.
Consider how much light will come into your kitchen And what kind of mood you want to create with your color choice. Do you want A warm And inviting atmosphere? Go for warmer colors such as yellow, orange, or red. Or if you prefer A cooler feel, try blues And greens. Make sure that whatever shade you choose fits with other elements of your kitchen like countertops And appliances so that everything looks cohesive.
Here Are Some Steps For How To Change The Kitchen Cabinet Color
Step 01: Clear Out Your Kitchen Cabinets

As the seasons change, So does the color of your home. One great way to update and freshen up your kitchen space is to clear out your kitchen cabinets And give them A new look. Not only can you change their color to match the changing season, But you can also add various design touches that will bring life back into your kitchen.
Start by removing all contents from your cabinets And wiping them down with mild soap And water. This will prepare them for painting or staining. Once they are dry, take a look at each cabinet individually. If you’re feeling adventurous, use different colors on different cabinets to give the room some dimension! Consider adding hardware such as handles or knobs to complete the transformation.
Step 02: Remove Cabinet Doors And Hardware

Removing cabinet doors And hardware is an easy And cost-effective way to change the color of A kitchen. With accurate measurements, the right tools, And some extra time, Homeowners can transform their cabinetry in no time.
The first step in this process is assessing whether or not removing the cabinet doors And hardware is necessary for painting. If it is, Measure each door before taking them off so that they will fit back on properly when reinstalled. After that, Unscrew all the hinges from the frame using A screwdriver or power drill depending on what type of screws are used. To avoid misplacing any pieces during removal, Place all parts into labeled containers or baggies as each one comes off.
Step 03: Steps And The Cabinets
A kitchen renovation can be A great way to refresh the look and change the color of the cabinet and feel of your home. One simple change that can make A big impact is changing the color of your kitchen cabinets. This project requires some steps, But with the right preparation, You’ll have beautiful new cabinets in no time!
The first step is to choose A new color for your cabinets. Consider coordinating with other elements of your kitchen such as appliance finishes And countertops. Once you’ve chosen a color, It’s time to purchase paint or stain And any necessary supplies (brushes, drop cloths). Make sure to take measurements so that you know how much material you’ll need.
Next comes prepping the existing cabinet surfaces. This includes removing hardware such as handles or hinges And sanding down any rough spots before applying primer or sealer. Then it’s time to get painting!
Step 04: Fill In Any Holes Or Cracks
Updating the look of your kitchen can be as easy as changing the color of your cabinets. But before you start painting, It’s important to make sure any holes or cracks in the cabinets are filled properly. With A few simple steps, You can ensure that your cabinet transformation turns out looking its best.
Start by inspecting the surface for any openings or damage. If there are gaps between boards or cracks in the material, Fill them with wood filler. Use A putty knife to push the putty into any small pockets And then level it off until it is completely even with the surrounding area. Allow at least 24 hours for drying so that excess moisture doesn’t interfere with your paint job.
After making sure all holes and cracks have been filled, Use sandpaper to smooth down rough patches And create an even foundation for your new paint job.
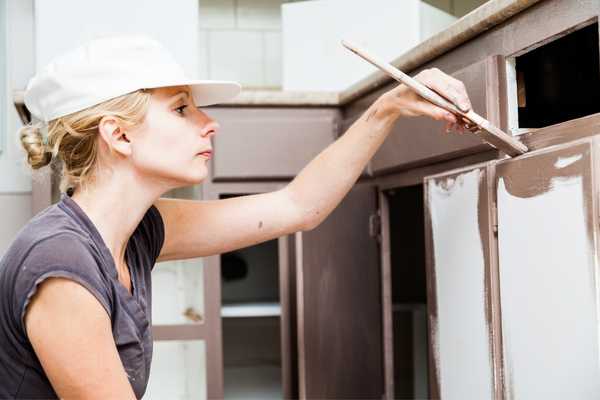
Step 05: Using A Sprayer To Paint Your Cabinets

A sprayer can be A great tool to change the color of your kitchen cabinet if used correctly And with the right preparation. Sprayers are typically more efficient than traditional paint brushes or rollers, Meaning you can get the job done much faster. With just A few simple steps, You can prepare your cabinets properly And get ready to start spraying away. First, Make sure that all surfaces are clean And free of dust And other debris before beginning to apply any primer or paint. Second, Tape off any areas you don’t want to be painted such as countertops or walls around the cabinet frames. This will ensure that you don’t accidentally get any over-spray in places where it isn’t wanted.
Step0 06: Apply A Primer Coat

Updating the color of your kitchen cabinets can be A daunting task. But it doesn’t have to be. Applying A primer coat is an essential first step in preparing your existing cabinets for A new finish. Primer provides adhesion, helps prevent peeling, And ensures A longer-lasting finish. Properly applied primer will also hide minor blemishes And provide an even base for easy painting or staining.
If your cabinet surfaces are glossy or have been previously painted, Start by sanding down the surface so the primer can easily penetrate them And adhere properly. Once you’ve finished sanding, Remove all dust from surfaces with A wet rag And let dry before applying the primer coat. With just one additional step you can help make sure that your new paint job lasts for years to come!
Step 07: Apply The First Coat Of Paint
Applying the first coat of paint to the kitchen cabinets is A great way to completely change their color And create A whole new look. This is A relatively easy DIY project that anyone can do with relative ease, As long as you follow some basic steps.
To begin, Make sure that you have all the necessary materials And tools for this job paint, primer, sandpaper, brushes, And rollers. Remove all hardware from the cabinet doors, Then use sandpaper to lightly scruff up the surface of each door. Wipe away any remaining dust with A damp cloth before priming your cabinet doors with an oil-based primer. Once they are fully dry, You can now apply your chosen paint color using either brush or roller technique.
Step 08: Apply Additional Coats Of Paint
Painting the cabinets is A relatively simple project that can be completed in just A few days. Before beginning, It is important to apply additional coats of paint to get the best look and longest-lasting protection.
In order to successfully change the cabinet color, Use multiple thin layers of paint rather than one thick coat. This will ensure even distribution And coverage on each surface. Begin by lightly sanding each cabinet panel before wiping it with A damp cloth or degreaser so the paint properly adheres. Use A high-quality paint brush specifically designed for painting cabinets, Then begin applying thin layers of primer first followed by light coats of interior latex paint. Allowing enough drying time between applications for best results.
Step 09: Paint The Interior Of The Cabinets
Adding A fresh coat of paint to your kitchen cabinets can give your entire kitchen A new look. Whether you are looking to change the color of your kitchen cabinets or simply want to extend their lifespan. Painting them is one of the most cost-effective ways to do so. If you’re ready for A change in the kitchen. Consider some of these tips for painting your cabinet doors and drawers.
First, Be sure to choose A proper interior surface paint that is both stain-resistant and durable. Eggshell paints work well on wood surfaces while satin finishes will help hide any imperfections on cabinet doors or drawer fronts. Remove all hardware from the doors And drawers before starting any project. This will make it easier to ensure an even finish across all areas of the cabinetry.
Step 10: Let The Cabinets Dry Completely
For those wanting to change the color of their kitchen cabinets, It’s important to make sure they are completely dry before proceeding. If the cabinets have recently been washed, Water can remain in hidden crevices and cause problems when A new color is applied. The paint may not adhere correctly And could potentially ruin the entire project.
The best way to ensure that A cabinet is completely dry before painting is to go over it with A microfiber towel. This method will allow you to absorb any excess moisture without doing any damage or leaving streaks. Once you’ve gone over the cabinets with A towel, let them sit for 10-15 minutes so that any lingering dampness can evaporate away naturally. You’ll be ready for painting after that!
Step 11: Reattach The Cabinet Hardware
If you’re looking to change the color of your kitchen cabinets, You’ll need to reattach the cabinet hardware afterward. This simple process can take as little as 30 minutes And will help you achieve A beautiful And professional-looking finish.
The first step is to carefully remove all of the hardware from the existing cabinets. You should use A screwdriver or Allen wrench to unscrew each piece from its mount. Once everything has been removed, Clean off any dirt or dust that has been collected on them since they were last used. This will help ensure that your new pieces stick and look great when attached.
Next, Choose your new cabinet hardware pieces and attach them in place using screws or bolts depending on what type of mounting system you have chosen for your cabinets. Make sure each piece is securely fastened into place before proceeding with painting or staining your kitchen cabinets.
Step 12: Reinstall The Cabinet Doors
Changing the color of your kitchen cabinets can make a dramatic difference in the overall appearance and feel of your home. If you are looking for an easy and cost-effective way to give your kitchen a fresh new look, reinstalling your cabinet doors is a great place to start.
Reinstalling cabinet doors will not only give you the opportunity to change the color of your kitchen cabinets but also allow you to customize their style and design as well. Whether you’re looking for something modern or traditional, there are plenty of options available that can help you achieve the perfect look for your space. Additionally, with the right materials and tools, installing new cabinet doors is an easy task that anyone can do on their own in no time at all!
Step 13: Apply A Protective Finish
Applying a protective finish is essential for ensuring that the new color you choose for your cabinets stands up to wear and tear over time. When applying a protective finish is to prepare the surface. This means removing all dirt, grease, wax, or other debris with a light sanding or degreasing agent. Once this is done it’s important to apply a thin coat of primer before painting or staining the cabinet doors and frames with an oil-based paint or stain. Once this has been done, allow ample time for drying before applying two coats of polyurethane sealer in order to create a durable yet attractive finish.
Step 14: Update The Cabinet Hardware
A simple update in cabinet hardware can change the entire look and feel of a kitchen – no need for a complete overhaul! Changing the color of your kitchen cabinetry is one way to give your space an entirely new vibe.
When deciding on a new color for your cabinets, start by determining what kind of feeling you’d like in the room. Or perhaps a bolder statement with brighter colors? Once you’ve decided on that, think about how much light comes into the room during different times of day or night – this will help determine if certain colors may be too harsh or if they’ll work perfectly with existing lighting fixtures.
Step 15: Use A Glaze For A Distressed Look

Glazing is an easy and effective way to completely change the color of kitchen cabinets with minimal effort. With just a few simple tools, some stains or paint, and a few hours of your time, you can transform your dull kitchen into something special.
Glazing kitchen cabinets involves applying thin layers of transparent translucent paint or stain over existing cabinet surfaces using a brush or roller. The key to achieving this distressed look is in how it’s applied. Start from the top and work down, making sure you leave behind streaks for an aged effect. You may need to experiment with different colors to get just the right shade for your desired look.
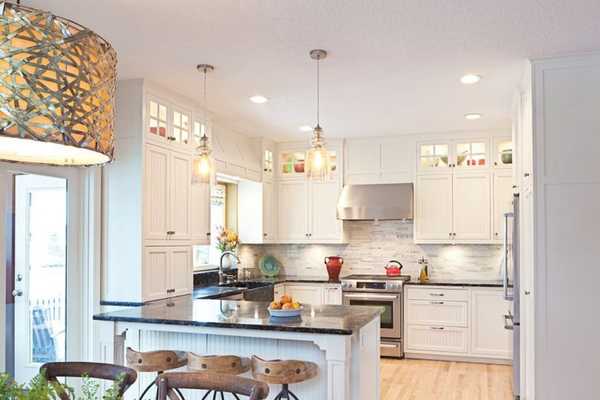
Step 16: Enjoy Your Newly Painted Kitchen Cabinets
Painting the kitchen cabinet and changing color is a great way to give your kitchen a completely new look. Changing the color of your kitchen cabinets can provide an inexpensive and effective way to transform the entire feel of your home. With so many options available, you can be sure you will find the perfect shade to fit any style.
The process for changing cabinet color is fairly simple and straightforward. To begin, all existing hardware must be removed. The old finish must then be sanded down and primed with a bonding primer before painting with a new color or stain. Once dry, additional coats may be needed for full coverage. Finally, reinstall all of the hardware for that finished look.
Tips For Kitchen Cabinets Clean And Maintains
Keeping your kitchen cabinets clean and well-maintained can be a daunting task.
Here Are Some Tips To Help You Keep Them Looking Like New
1. Cleaning
Regularly dust the surface of your cabinets with a damp cloth or microfiber mop. This will help prevent dirt and grime from building up on the surface. You can also use a mild detergent solution to wipe down the cabinet surfaces, making sure to rinse off any residue.
2. Maintenance
To ensure that your cabinets stay in top condition, it is important to perform regular maintenance such as checking for loose hinges and screws, tightening them if necessary, and applying wood preservatives or sealants to protect the finish of the cabinets. Additionally, you should periodically check for any signs of water damage or mold growth in order to address these issues quickly and effectively.
3. Regularly Wipe Down The Cabinets
Wipe down the cabinets regularly with a damp cloth or sponge. This will help remove any dirt and debris that has accumulated over time and prevent grime from building up. Additionally, use an all-purpose cleaner or vinegar to disinfect any areas where food may have been stored in order to kill any lingering bacteria. Finally, apply a protective sealant on the surfaces of your cabinets once every few months to protect them from moisture damage and keep them looking great for years to come.
4. Use Cabinet Liners
Cabinet liners can be a great way to keep your kitchen cabinets clean and maintained. Whether you are looking for a simple solution, or something more decorative, cabinet liners come in a variety of materials and styles to suit any need.
The first step is deciding which type of liner you would like for your cabinets. Depending on the look you’re going for, materials can range from vinyl mats that provide easy cleaning to textured paper options with subtle designs that add an extra layer of protection while making your cabinets look stylish. Additionally, consider what kind of items will be stored in the cabinet. This will help you determine whether you should choose a waterproof option or stick with something non-absorbent.
5. Avoid Excess Moisture
Proper care of kitchen cabinets is essential to maintain the quality and appearance of any home. Excess moisture can cause damage to wooden cabinetry, so it’s important to keep an eye on where and how much moisture is present in your kitchen.
First, try not to allow water or steam from cooking pots and pans to get onto cabinet surfaces. If this isn’t possible, make sure that any water splashes or steam are wiped away immediately with a soft, dry cloth. Additionally, avoid using harsh cleaners or chemical-based products when cleaning your cabinets as these can damage the wood over time. Instead, use a mild soap mixed with warm water for the best results.
6. Check And Tighten The Hardware
Many homeowners take pride in their kitchen cabinets and enjoy the look of a freshly cleaned, well-maintained piece of furniture. However, what many people don’t realize is that the hardware on their cabinets requires attention as well. Regularly checking and tightening the cabinet hardware can save time and money by preventing problems like sticking drawers or sagging doors.
To keep your kitchen cabinets in top condition, here are some tips to follow: First, inspect each piece of hardware regularly for any signs of rust or wear and tear. If you find any, replace them right away so they don’t become a bigger issue down the road. Secondly, use grease or oil if needed to help with the smooth opening and closing of drawers and doors.
7. Refinish Or Repaint As Needed
When it comes to tips for kitchen cabinets, cleanliness, and maintenance are essential. Cleaning and maintaining your kitchen cabinets can be an easy task with a little bit of preparation. Refinishing or repainting your cabinets is the most effective way to keep them looking fresh and new. This article will provide some helpful tips on how to refinish or repaint your kitchen cabinets as needed in order to keep them looking great.
First and foremost, you should consider the condition of your existing cabinetry before deciding whether or not you need to refinish or repaint them. If there are any signs of wear and tear, then refinishing may be necessary in order to restore their original look without having to replace them altogether. Once you’ve decided that refinishing is necessary, then it’s important to properly prepare the surface before starting the job.
The Final Thoughts
Change color kitchen cabinet is a great way to transform the look and feel of your kitchen. Whether you decide to go bold with a bright hue or choose a more subtle tone. You can find the perfect shade to fit your style and budget. There are many benefits to painting your kitchen cabinets, including increased aesthetic appeal, improved durability, and increased value for your home. Before starting this project, it’s important to take all the necessary steps to ensure you get the desired results.