Oak—majestic, enduring, and full of character. Whether your dining table has been a beloved centerpiece for family meals or a thrifted gem waiting to shine, refinishing can breathe new life into this timeless wood. With the right tools, a little patience, and this comprehensive guide, even a complete beginner can transform a tired oak table into a beautiful, renewed showpiece. Learning how to refinish an oak dining table is not just a project—it’s a rewarding journey into craftsmanship.
Why Refinish Your Oak Dining Table Instead of Replacing It
Buying new furniture may seem like the easier route, but there’s profound satisfaction in restoration. Refinishing an oak dining table saves money, reduces waste, and allows you to preserve the stories etched into every grain and scratch. It’s sustainable, sentimental, and surprisingly therapeutic. More importantly, oak’s inherent strength and grain pattern make it well worth rejuvenating.
What It Means to Refinish an Oak Dining Table
Refinishing is not just about slapping on a new coat of stain. It involves a full reset—stripping the old finish, repairing imperfections, sanding the surface to smoothness, and applying fresh layers of stain and sealant. This meticulous process enhances the wood’s natural charm while protecting it for decades to come. It’s restoration with intention.
Is Oak a Good Wood for Refinishing?
Absolutely. Oak is one of the most durable and forgiving hardwoods, making it ideal for refinishing projects. Its open grain takes stain evenly, and its density resists warping over time. Whether red oak or white oak, both varieties respond well to sanding and finishing, revealing deep, mesmerizing textures that age gracefully.
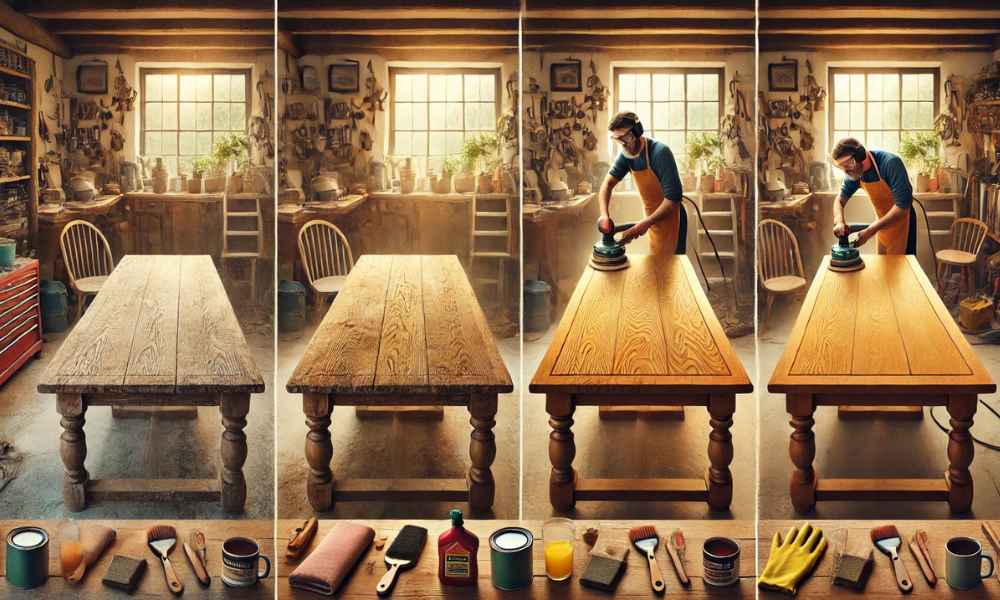
What You’ll Need to Refinish an Oak Dining Table
Before you begin, gather your essentials. At minimum, you’ll need:
- Sandpaper (various grits)
- Orbital sander (optional but recommended)
- Chemical stripper or sanding blocks
- Wood filler
- Clean cloths or tack cloths
- Wood stain
- Polyurethane or wax sealant
- Safety gear: gloves, goggles, and a mask
Having these tools on hand ensures a seamless workflow, helping you avoid interruptions during crucial steps of the refinishing process.
How to Set Up Your Workspace for Refinishing
A clean, well-ventilated space is crucial. Choose a garage, patio, or large indoor room with windows open and fans for air circulation. Lay down a drop cloth or tarp to catch debris. Ensure you have sufficient lighting—both natural and artificial. Secure your oak dining table on a level surface, and clear the area of items you don’t want dusted or stained.
How to Clean Your Oak Dining Table Before Starting
Start with a thorough cleaning to remove grime, oils, and residues. A mixture of warm water and mild dish soap works wonders. Use a soft sponge or microfiber cloth and gently scrub the surface. Rinse with a damp cloth, then let it air dry completely. This step ensures that nothing interferes with the stain or finish later.
How to Remove the Old Finish from Your Oak Table
This is where the transformation begins. Apply a chemical stripper according to the manufacturer’s instructions or go the manual route with sanding. If using a stripper, let it sit until the finish bubbles up, then scrape it gently with a plastic putty knife. Be methodical and patient—rushing risks gouging the wood. For sanding, begin with a coarse grit (60–80) and work toward finer grits (120–220).
How to Repair Scratches, Nicks, and Dents in Oak Wood
Inspect your table closely. Fill small gouges or dents with a wood filler that matches the oak’s tone. For light scratches, a bit of water and heat (like an iron with a damp cloth) can swell the wood back to level. Once repaired, sand the patched areas gently to blend with the surrounding surface. This is key to achieving a flawless, uniform look.
How to Sand an Oak Dining Table Smoothly and Evenly
Sanding is both art and science. Use an orbital sander for large, flat areas and hand-sand intricate edges or corners. Move in the direction of the grain to avoid swirl marks. Begin with medium grit, gradually moving to finer grits for a silky-smooth finish. Wipe down with a tack cloth between sanding stages to remove dust particles.
How to Choose the Right Stain for an Oak Dining Table
Oak pairs beautifully with a wide range of stains—from golden honey to deep espresso. Consider your room’s decor, lighting, and personal style. Test your stain on a hidden section first; oak’s grain can alter the final hue. Oil-based stains offer rich tones, while water-based options dry faster and are more eco-friendly. The choice sets the entire table’s aesthetic.
How to Apply Wood Stain Like a Pro (Even as a Beginner)
Apply stain with a lint-free cloth or foam brush, working in manageable sections. Rub it into the wood with even strokes, following the grain. Let it sit for 5–15 minutes depending on how deep you want the color, then wipe away the excess. For darker results, apply a second coat after drying. Avoid over-saturating the surface—it can blotch.
How to Seal and Protect Your Refinished Oak Table
The final flourish is the topcoat. Use polyurethane for durability, especially if your table sees daily use. Brush on thin, even coats, letting each dry fully before sanding lightly with fine grit. Apply 2–3 coats for long-term protection. For a softer sheen, consider furniture wax or tung oil, especially if you love that hand-rubbed, vintage vibe.
How Long to Let the Table Dry and Cure Properly
Drying is not curing. While your stain or sealant may feel dry to the touch within hours, full curing takes days. Avoid placing heavy objects or covering the table for at least 72 hours. Full cure times can stretch to a week depending on humidity and product used. Patience here prevents cloudy finishes and surface damage.
How to Maintain Your Refinished Oak Dining Table
Daily care keeps your hard work intact. Use coasters, placemats, and gentle cleaners. Avoid harsh chemicals and direct sunlight, which can fade the stain. Reapply a protective wax coat every few months for added luster. A quick buffing with a microfiber cloth can revive its sheen between deeper cleanings.
Common Mistakes to Avoid When Refinishing Oak Furniture
Skipping prep work, rushing the drying process, over-sanding edges, and applying too much stain at once—these are pitfalls to avoid. Always follow grain direction, and don’t mix incompatible products (like water-based stain and oil-based sealer) unless fully dry. Take your time—refinishing is a marathon, not a sprint.
Final Thoughts
Refinishing is equal parts precision and passion. It’s an opportunity to slow down, engage your senses, and create something lasting with your own hands. Whether your oak dining table ends up rustic and raw or smooth and modern, the real beauty lies in the process—and the pride you’ll feel every time you sit down for a meal. Mastering how to refinish an oak dining table means gaining a skill that can be used again and again—breathing new life into old wood, one piece at a time.